Sunday, December 8, 2013

Getting a house ready to sell


I started preparing the house for the market on Monday. I spent all day Monday and Tuesday in the yard because a winter storm was coming. It snowed Tuesday night and by Wednesday, I started on the inside and satisfied with the work accomplished outside. I swept out the shed, cleaned up debris, sucked up dirt and leaves. etc. etc.

Wednesday was spent cleaning and filling holes in the dry wall. Wednesday night I hired a lady to clean the bathrooms and kitchen appliances. She was more of a maintenance cleaner than a deep cleaner. Some of her work had to be redone.

Thursday I hired Edie Irey's cleaning company. Her help couldn't come due to the fridged weather, but she was awesome. She cleaned baseboards, window tracks, and door frames. I started painting walls and baseboards. Gregg came after work and we painted into the night. Gregg's help was invaluable.

Friday morning we finished painting and Edie worked on the kitchen and wood floors. Carpet cleaners came around 11 that morning.  I worked on miscellaneous repairs, painting, caulking, and cleaning.

Saturday morning Gregg helped me stage the house, and we moved heavy furniture around. We planned to clean out the garage, but it was too cold to do much. We were about finished when I went to close the lid on the five gallon bucket of paint. Feeling exhausted, I lost my balance while stepping on the lid, and paint went all over the floor. I went home for the shampooer and Gregg spent the next couple of hours cleaning up the mess. However, we were out of the house by 11 AM just in time for the first showing.

Below is the great room


The only furniture I brought in were 2 bar stools.

I used many of the same decorations that was on top of the kitchen cabinets before. I added a few of my own and rearranged everything.

Below is the kids bath.

Most of the bedrooms only got a window covering and a silk plant on the window seal. However, this room got the rocking horse and giant bear. The stars were already there.

The master bath turned out great. I bought towels and miscellaneous pieces but most of it came from my house.


The down stairs bathroom received new towels and a bit more greenery.

My favorite turned out to be the half bath but I forgot to get a picture.

Reupholstering the Love Seat

New chairs in the living room.
 One ottoman found a home in the computer room.


I thought I would buy new furniture for the West wing. After looking at prices, I decided to buy two chairs and fiture out a way to save the existing love sea. First I painted and glazed the wooden accent pieces.
 Then I used the existing couch cover along with another couch cover taken off the couch in the west wing and remade it for a tighter fix. After hand sewing around the wood sections, tucking under the edges and staple gunning them down, I used upholstery tacks (actually, these are thumb tacks painted rubbed bronze) to hold the fabric in place and add a decorative touch..

I painted and glazed end tables to match the wood on the love seat.

Below is the finished room.

Before pictures
Below is the sloppy look of the couch before reworking it.

Flood and vermin proofing the yard

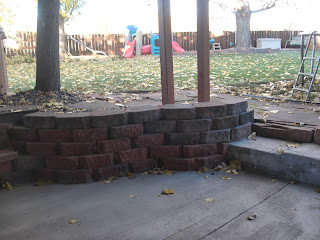
We raised the section on the right here to keep water from funneling in. We have a drain that feeds into the french drain so the water will eventually get pumped out into the ditch. However, one week prior to the Boulder Floods as we call them, we noticed rain water funneling in so quickly that the water was backing up into the house. We were home when it happened and caught it quickly so no permanent damage was done. We got the chronic problem fixed prior to the heavy floods. It was certainly a blessing to notice it when we did.

 Below is my favorite fix. The down spout is connected to underground drainage that funnels out into the yard. However, when the drains fill up, water would spill out of the down spout and funnel into the area where the walk out basement was created. If that funnels in too quickly, the water will find its way into the house. We took a regular plastic down spout gizmo and cut a whole large enough for the black drainage pipe to fit in. After sliding the gizmo over the black drainage pipe, we caulked the gap. It worked beautifully when the Boulder Floods came. Rain water poured down the spout, filled up the pipes in the yard and then spilled over into the plastic gizmo. From there it innocently found its way into the grass away from the foundation. It worked so well, we did the same thing in two other locations.

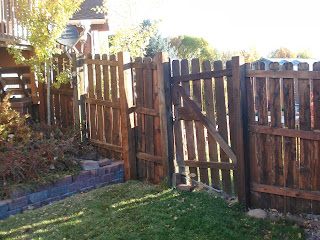
We widened the gate so that a wider lawn mower can get into the back yard. Lawn services are often cheaper if your backyard has good access.

Check out the fence post in the center of the photograph below. There is a huge owl perched there that is apparently the cause of death to a number of small rabbits we found victimized in the yard. Does anyone have any ideas on how to keep it around? Sure is a good solution to rabbits.

See the fence latch below. Along with metal edging along the bottom of the gate, the rabbits have found it difficult to get in with this tight fit.

Before Pictures
Here is a picture of the ground level before raising the right corner. Water funneled in much like the leaves you see here.

Below is the gate prior to widening it. Gregg and I did the labor ourselves when the handyman kept putting us off. We are happy with the results.


Sunday, October 20, 2013

How to make a root cellar without digging

After visiting my Aunt Lois last summer, I decided that  I wanted to have fresh apples, carrots, potatoes, and onions all year round. The pioneers got it right with a root seller which keeps the produce cool, frost free, and aired out to prevent molding.

Most root sellers are underground.. However, a few years ago, we dug out our basement to make a forced walk out. It was only about 4 feet down, but nevertheless, I do not want to ever dig again...ever.

So after checking on line (I love all the info you can get on line.) I realized that our shed that is tucked neatly under our deck and snuggled up next to the north side of the house, should work well.


I started by caulking the bottom side between each plank. The top side was already caulked and painted with a roof over that, but I knew that any leaks would be devastating so I'd need to do a little overkill.


Next I put in 2 inch Styrofoam that has a 10 R value. This was much harder than I expected. It had to be tight enough to keep out the heat or cold but still loose enough to fit between each rafter. Styrofoam is recommended in an area that could possible get moisture. It is also has the highest insulative value for the thickness.


Next I added a vertical piece of Styrofoam directly below the horizontal piece on each end. There were many gaps on the ends since the blocks were so difficult to maneuver.


Below the Styrofoam, I put regular fiberglass insulation. It was much easier to install and cheaper.

During the summer months, the room will need ventilation. We added one vent near the ceiling and the other one as low as possible  in between the same two studs. The vents can open and close and have metal mesh to keep out animals, but it wasn't enough for winter months. Obviously, during the winter, the vents need to be insulated so I wrapped a piece of Styrofoam with bubble wrap. It was tricky to sew the seams together and even trickier to turn it right side out, but I did it and then stuffed the Styrofoam inside and sewed and taped the end closed. I included two flaps on each side with which to pull it in and out of the wall. It has a fairly tight fit and the flaps proved to be a necessity.


Then I used bubble wrap and sealed the insulation off. This was tricky too because I didn't want to take all the hanging shelves down so I had to cut around all those obstacles. However, it worked well in the end.


I was trying to repair some plastic shelves to put the produce on when I noticed these shelves tossed aside at Lowe's. They were being thrown away and the clerk said I could have them. It fits perfectly and now the test is on. The room has air, it shouldn't freeze, but it should stay cool.

Another plus is that our sump pump is in the corner. Though most of the drain pipes are below ground and shouldn't freeze, I've always wondered if sub zero temperatures would create a problem. Common sense says that if the temperature is that cold, water won't be seeping into the well either, but it's still good to know that the room is insulated.

I think my pioneer ancestors would be proud.

Wednesday, August 28, 2013

How to add a pocket to luggage large enough for a lap top

We travel a lot... okay too much...but because of that, we have to have luggage fit for airport security--condensed, a spot for everything, and easy to get things out for display at the drop of a hat.

Many times my husband has to take his lap top with him so he can work or at least keep up with work. We have three and only three travel bags that work well for everything we need regardless of the destination. We like three because it's easier to find one spot in the overhead storage in place of two, and when we get stuck having to fly on Spirit (don't like them at all!), we only have to pay for one carry-on. The other two can be considered personal items.

Only problem was, the lap top was not easy to pull out when going through security.

Here is our solution...

 This bag was our son's soccer bag from high school. However, we like it because there are plenty of pockets on the outside for particular items we want to find easily and not get crushed. We also like that it qualifies as a "personal item" but we can add a lot of extra stuff when needed. Lastly, we like that there is no one in the whole world that would choose this particular bag for traveling so it is easy to spot among other traveler's bags..
 Like I said, it is ideal for us except for the fact that the lap top would have to be stored on the bottom and had to practically be emptied in order to expose the lap top. So, I bought some bright orange canvas (color selected by grandchild). and cut it to be a little taller than the lap top and the same length as the bag.
I sewed in pockets on the inside for the rechargeable cords etc. I sewed the zipper on first, unzipped it all the way and then sewed the other three sizes. It really wasn't too tedious and it works great.

Well that is after replacing the main zipper on top. One time when flying United they made me stuff my airplane pillow into the bag or else pay for another checked bag--ridiculous. So sad for me, it split the zipper open. It has never been the same since so I sewed another zipper on top of the existing one. It's hard to explain but the zipper I bought looked nice on the outside. So since I'm lazy as often as possible, I left the old one in place. They actually both work right now--the new one much better than the old.

Of course, one never knows what airport security will do next, but at least for now, we are ready for them.

Tuesday, August 27, 2013

What to do when you smash your finger

I was minding my own business--just walking into the house from the garage when it happened. Ouch! Awh! Ouch! The new city codes demand a tight slam... oh I mean close... on garage doors. It's more important to keep out a fire than to protect our body parts so that makes sense.

Anyway, I recommend keeping any body parts you like and want to keep for a while close against your body at all times because catching anything in the mouth of these monster doors is rather painful and takes a millennium to heal.

 Step number 1: If you go to a small town urgent care facility after such an event, ask them if they know the difference between dis-solvable stitches and non-dis-solvable stitches.  If they look at all confused, then either ask to see their credentials or else run away.
 Step number 2: Always consult a hand specialist within a few days of the accident. Anyone else will most likely turn a little green and tell you that it doesn't look very good and send you away.
A hand specialist will often start over... carving and sculpting your finger as if it were a piece of clay. This is not fun. I repeat.... you do not want this turn of events. Therefore, consult a hand specialist after a few days if necessary rather than after a few weeks.

If the end of this story is a good one, you will get another picture. If not...well,you don't want to turn green and say that it doesn't look very good so I'll save you the trouble.

Looks better--don't you think? The second surgery took place on August 14th (Gregg and I's anniversary). Growth was detected the middle of September. It is now 2 1/2 months since that glorious announcment and the nail has grown out about 3/4 of the way. Only about half of the nail is very healthy but that means in a couple of months, it should like quite normal.

How to landscape in a hurry

When you have a large gathering in a week and want to fix up the yard and reduce Spring Creek hurricane dust, here is a way.

 After leveling the ground, use some kind of ground cover to keep weeds out. We used plastic hanging around in the Olsen's yard. If you're going to add rocks right away, you don't have to put many landscape pins in. However, the dirt next to the house in both the front and back was impossible to control but they didn't want to add rock until they had finished the cement edging. Therefore, we laid down plastic and put lots of staples--perhaps every couple of feet to keep the ground cloth down. Hopefully, it will last all year until they are ready for more rock.

Another fast way to eliminate dirt and dust is to add sod. Seeding is much cheaper of course, but there's nothing like laying out thick green grass to finish off a job. Actually, I've never had much luck with seed. I hear fall is better than spring to plant unless you have a warm spring. It has to stay wet for so long too. I don't recommend it if you can help it.

Inexpensive Bike Rack

While helping to organize the Olsen's garage, we needed to park bikes. Check this idea out using remnants of wood found in the Olsen's yard.


It was so easy; we made it up as we went.
The added shelf for helmets and bike pumps was a winner.
The bikes that were not used regularly were hung from the ceiling.

We used 2 1/2 inch wood screws for the project... screwing the rack together before mounting it on the wall.
I suggest you use a stud finder when mounting to the wall and put all screws into studs.
(It would also help to measure the height of the electrical outlet so you can avoid covering it up with the 2 x 4 or shortening the length of the shelf in order to avoid it.)

Sunday, August 4, 2013

Chelsea and Alma's new house

Alma built a beautiful home. in Spring Creek NV where building is still strong. These are only a few shots but can give family members a feel of the results.
 The stamped cement is in the front and back.. It adds a luxurious touch.
 Alma didn't actually build the piano, but he did build the corner that houses it.
 We didn't have time to clean up much, but you can see there is plenty of room to "crawl" around.

Again, we didn't clean or even make beds. However, the master bedroom is large enough to include a set of weights. Seems like they are more for looks than use.

 The master bath is gorgeous.Porter suggested the recessed boxes, and both Alma and Chelsea planned the tile.
 The double headed master shower is sown off with the diagonal trim--beautiful.
 The kitchen is my personal favorite since I helped plan and design the cupboards. Alma designed the floor which is a combination of wood and tile.The mix of colors was a compromise between Alma and Chelsea's wishes, and the granite was picked out by both of them. It is very functional and again, not cleaned up before the picture was taken. As you can see it is very beautiful in any condition.
 The electric fireplace was added after they moved in and ran out of propane one cold winter day. The propane is refilled every month or as needed, but being a new house was left off the delivery route one time. Though not needed now, it's nice to have a backup when needed.